PSL Lab |
|
|
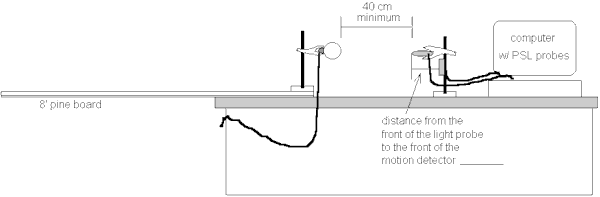
Materials: PSL base unit, blue TLp Module, photometric light probe, yellow Motion Module, distance probe, meter stick, light bulb with AC plug and cord, 2 ringstands, 2 test-tube clamps, 8' pine board and blackout paper.Procedure: 1. Do NOT look ever directly into the light source! 2. Align the equipment as shown in the diagram below. Place the photometric light probe in the jaws of the test-tube clamp and then slip the clamp on the ring stand. Be careful to treat the photometric probe carefully -- do not overtighten the clamp around it. Next, attach the distance probe to the ring stand under the light probe. Adjust the light source in the second ring stand so that it is at the same height as the light probe and its presence can be detected by both probes. Distance between the front of the light probe and the front of the motion detector ______ .
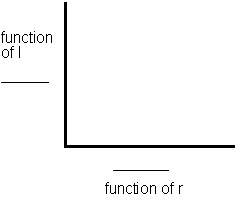
3. When the equipment is set-up correctly, turn on your computer and choose the program PSL Explorer from the Main Menu. When the final screen settles, TAB to Create Experiment, press ENTER. Cursor down to Light probe, press ENTER. Then choose photometric, y-axis, smoothing on, low intensity. Then cursor to Distance probe, press ENTER. Then choose x-axis. When this is done, choose to accept experimental set-up (F8). Next TAB to Reset Parameters. Change the Duration to 120 seconds, the y-axis maximum to 100 lux, and the x-axis to a maximum of 3 meters. Then cursor to Run Experiment, press ENTER, cursor down to Calibrate, press ENTER, and choose Light. Enter the calibration number printed on your photometric probe. Then calibrate the distance probe by entering the correct room temperature. Make sure that you allow your data rate to be as large as possible. ESC back to Run Experiment and choose Preview to display the intensity of the light in Lux and the distance in meters. Move the ring stand holding the light source and make sure that the distance probe is recording its location. When you have confirmed that your apparatus is working, move the light probe assembly so that the light source is NO closer than 40 cm to the light probe. Press ESC, choose Run experiment, and START to begin. 4. The program will automatically record the intensity and distance for you. Since the sampling rate is low, be sure to move the light source away from the probes slowly. Between each adjustment, count to 5 and then move the source another 10-15 cm further. Continue until you run out of board; then slowly move the light source back towards the probes. The data should replicate itself on the screen. A successful trial MUST include both complete directions. 5. Save your data to the My Documents folder. Do this by going over to DISK, down to spreadsheet, F6 to change drives, C:\mydocuments press INSERT to save and type in your filename as #AIDElt DO NOT ADD AN EXTENSION, the PSL program will add its own. Let the description be your names and today's date. 6. Once your data is saved, you will now analyze the mathematical relationship between I and r. Some suggested functional forms are given in the chart below. To begin your investigation, use the graph of I vs r currently shown on your screen in the first line of the chart. Go to CALCULATE, choose the X-axis, then SUBTRACT and subtract the distance measured between the front of the motion detector and the light probe from every distance value. Then Go to GRAPH, press ENTER. An arrow should appear on your graph. Now press M for MARK and mark all of your data points. After marking the entire graph, press F for line of best fit and press ENTER to draw in the line. Record this equation next to your graph in the area provided below. Was it linear? If not, choose the Calculate option, then X-axis, and then RECIPROCAL. This will take your experimental data and graph it as I vs 1/r. Sketch this graph and write its equation with the correct functional form of r. Was it linear? If not, choose the Calculate option again, X-axis, and then SQUARE. This will produce the next functional form I vs 1/r 2 given in the chart. Sketch this graph and write its equation with the correct functional form of r. Was it linear?Functional form Line-of-best fit equation Sketch #1 I vs r ______________
#2 I vs 1/r ______________
#3 I vs 1/r 2 ______________
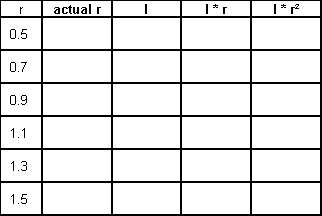
Conclusions: 1. Using your data table from your initial graph of I vs r, form complete the following chart. Remember to subtract the distance between the front of the motion detector and the front of the light probe from each of thevalues shown in the PSL data table.
2. Which column (I times r) or (I times r 2) produced a more constant product?___________________________________________________________________________ 3. What mathematical form in Step #6 gave you the best straight-line fit? ___________________________________________________________________________ 4. Do the answers for questions #2 and #3 seem to be in agreement? Why or why not? ___________________________________________________________________________ 5. What procedural source(s) of error could account for any glaring irregularities in your best "line"? ___________________________________________________________________________ |