Physics II: Electric Field Mapping
Purpose: The purpose of this lab is to experimentally map the positions of seven equipotential surfaces on each of two already prepared field maps. After locating these surfaces, electric fields lines will be constructed to reveal two classic electric field configurations. Two AP essays will then be used as conclusions to insure that the necessary relationships between voltage (potential), field lines as well as work/energy have been developed.
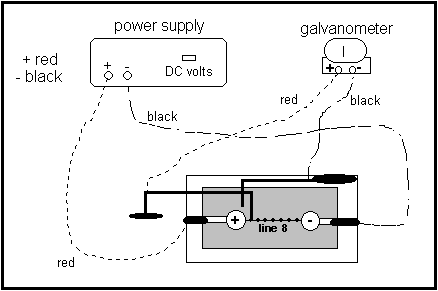
Equipment needed: field mapping board, fields maps, (2) graph paper, galvanometer, test probe, reference probe, test leads (2 red, 2 black), seven colored pencils
Preparation: While two members of the lab are setting up the equipment, one member should grid off each piece of graph paper so one sheet "looks like" each of the already prepared field maps. When you take data for the lab, your field maps and graph paper must have the same "grid" to insure that the proper positions are being recorded.
Select the field map that shows two point sources. Place it on the mounting board with each spring mounted contact touching one of the silver electrode configurations on each side. Then connect the power supply to the binding posts on the mounting board and the galvanometer to the two probes. When you believe that your circuit is hooked up correctly -- before turning on the power! -- call Mrs. Colwell over for an inspection. Set your voltage no higher than 4 volts.
Part I. Data collection On line #8 that directly connects the two point charges there are seven (7) grid locations. Use these as your reference positions. Place the mounted reference probe (the one on the stand) so that it rests on the first of these seven grid points. Do not move this probe until you are told to do so later. Instead, move the hand probe lightly over the paper until the galvanometer needle remains at zero; this shows a position where there is NO voltage between the two probes. Mark this position on your graph paper. When testing, do NOT ping the galvanometer -- it is very sensitive to even the smallest currents. Continue lightly sliding the hand probe over the field map until you locate six (6) points that are at the same potential as this first reference position. Color all seven of these locations with the same color.
Now move the mounted reference probe to the second reference position along row #8. Find six (6) test points that are at its same potential - color each of these in with a second color. Repeat this process until all seven reference positions have been investigated. When have finished, you should have a total of seven (7) uniquely colored equipotential surfaces, each containing seven (7) points.
Now repeat the entire process with the second field map except that you only need five (5) equipotential surfaces. You must finish ALL data collection during this lab period.
Part II. Data analysis After all requested equipotential surfaces have been located on each field map, you need to construct seven (7) fields lines. Remember that a field line begins on a positive charge and terminates on a negative charge. Field lines cross equipotential surfaces at right angles but NEVER cross each other. Use a protractor to help locate and track seven (7) field lines on each map. Draw these lines in as smoothly as possible with a black pencil. Place arrows on each field line. Scatter your field lines so that they fill in the entire field map.